Posts

how to send invite and give a access of selected application on App Store

Image
New Invitation on App Store. Step 1: Login With your Developer App Store account ( App Store Connect ). Step 2: Now you can see the Landing(Dashboard) on App Store Connect. click on Users and Access .  Step 3: click on + icon.  Step 4: fill necessary details. like First name, Last Name, and email address. Step 5: Select a roles of you want to give them. like Admin, Developer, Marketing, etc Step 6: give Additional Resources. like you want to give a access to create a certificate. or just to manage developer certificates or etc. Step 7: Select a Application that you want to give a access.      Note:- if you not give a application access then that invited papule does not able to see a any app  Step 8: After all selection past at the bottom is this for click on invite  Manage Invitation on App Store. Step 1: Login With your Developer App Store account ( App Store Connect ). Step 2: Now you can see the Landing(Dashboard) on App Store Connect. click on  Users and Access .  Step 3: click on
Windows Keys

Windows Keys: XP SP1 :-  1. FCKGW-RHQQ2-YXRKT-8TG6W-2B7Q8 2. KQP9B-C2RTK-KWBPY-6FQMB-83K98 3. 8XPDH-PCKKG-6MPKT-FTM67-2FMWG 4. C4FPJ-HQCGP-QD3XC-2JF34-FT8Y6 5. DP2RT-3B8YR-4JXWB-HHGPK-82FWB Windows XP Professioanl CD KEY 1. CDWVP-GBJRG-PDJRG-Y6CMB-HCGG3 2. TWHCC-DC33F-G4JJP-BTR2B-RKRYT 3. 4X7WM-GTH3D-DWVCV-H382J-HPMRD 4. VQD7P-3KK7H-M7VV2-CTXM4-MC7FW 5. C34VY-TJYXD-3BG2V-HYX8T-76CY6 6. 3D2W3-8DJM6-YKQRB-B2XDB-TVQHF 7. YXF2Y-QRRKR-BFKVQ-RHQ7H-DJPKD 8. BMYY7-WH8QJ-6MTWG-MXXVQ-MD97B 9. CRBH4-MXB2P-HP7V6-8YTMD-CBHJR 10. G2JMP-2PC7G-RYBYX-PPF38-3KKTY 11. HBJFW-XJ7K3-34JDX-VPPTW-227G6 12. RXKFJ-67HBV-84TD2-RMDK8-9BDMT 13. 4FWCC-M3XVT-GQVVC-MKQYG-HP7YB 14. VV2JP-HCKYQ-DMYB8-MQ733-6CHGC 15. V8KG7-FRF6Y-WWRRB-G7KYY-TD4B7 16. MTTXT-YX8JQ-6PC2M-TTXDT-WDM8K 17. 8V678-K66HP-GH28R-PTHKH-98PWP 18. 4BR3X-4CP6X-2DTXP-FFDHT-7Q298 19. CFYHY-FQPJR-RWPC6-PWHKB-MXVKH 20. YC62K-W8FW7-7BGVV-PYXD4-R679J 22. KC4BB-2JHWW-VKCD6-2MXFV

How to Create SceneDelegate object in swift 5 Xcode 11*

How to Create SceneDelegate object in swift 5 Xcode 11* In Below aversion of Xcode 11 we are used ApplicationDelegate object for Access ApplicationDelegate class object. In Xcode 11 new Thind are introduce is that is SceneDelegate. SceneDelegate delegate is helper class of ApplicationDelegate. ApplicationDelegate is manage multiple things in preview so there is multiple junk code is write there. So Apple is   divide in two Parth   *First* :- Application Launch, Redirection, or etc. *Second* :- After Application Launch State like DidBecomeActive, WillResignActive, WillEnterForeground, DidEnterBackground. In First step All Applications launch and Redirection and all other thinks related application is do here. In second step After the lunch application do any this is done by SceneDelegate. So work of Application delegate is residence   Now how to crate SceneDelegate Object to access that that functions and objects. Here is both Object to access let scene

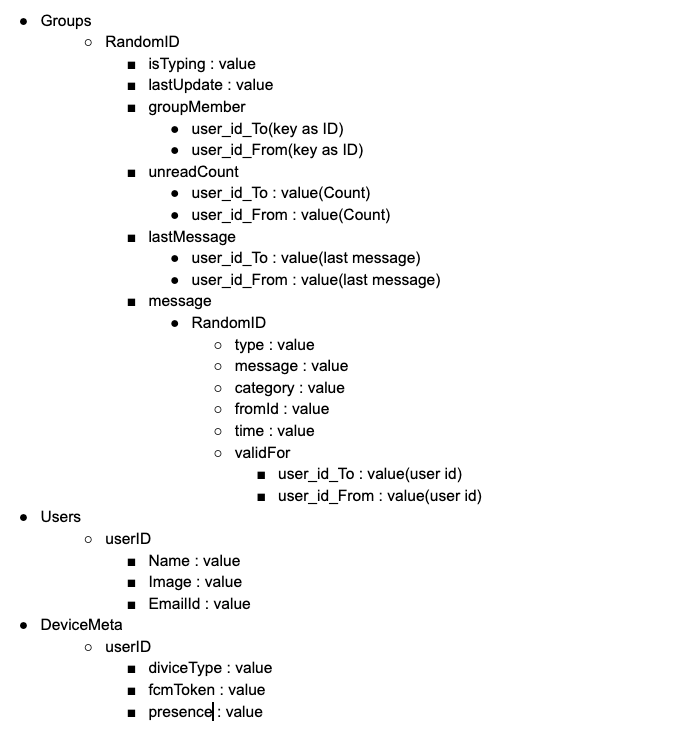
General structure of firebase chat for all platform

Image

Steps to follow for installing iOS App while in the Development(TestFlight) Phase

Image
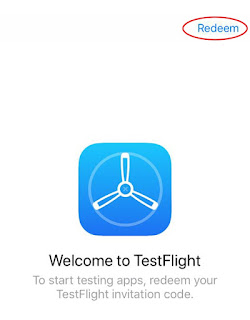
For any application development, there are some steps that need to be tailed varied from podium like in iOS. So, below are rudimentary steps that need to be followed to run your test application that perfectly matches Client’s requirement. Steps for iOS Platform : For Installing app an invitation mail will be sent on your Apple Email-ID. Once you receive and accept the invitation, we will add you in the Test Flight User. Then again you will receive a new mail from Test Flight, which will state your Redeem code. Once you receive your Redeem Code, there are few steps by which you can install the app on your device which comprises of: Step-1:   Open the Test flight application. Step-2:   Click on the Button named Redeem which will be seen on the top-right side of the application. Fig.1 Click on Redeem for your test application Step-3:   After clicking the redeem button, it may ask for the Redeem code. You need to enter the exact Redeem code that you received in your

Easy way to push and pop UIViewController in swift 5

Step 1 :- Create New file with Name “ExteantionUIViewController.swift” Step 2 :- Copy and Paste this below extension file import UIKit let Application_Delegate = UIApplication.shared.delegate as ! AppDelegate extension UIViewController {          func popVC(_ animation : Bool = true ) {         self .navigationController?.popViewController(animated: animation)     }          func push( _ viewController : UIViewController, animation : Bool = true ) {         self .navigationController?.pushViewController(viewController, animated: animation)     }     func goBackToViewController(ViewController : UIViewController.Type,isAnimated : Bool = true )-> Bool     {         var isVCAvalabel = false         for controller in self .navigationController!.viewControllers as Array         {             if controller.isKind(of: ViewController)             {                 self .navigationController!.popToViewController(controller, ani

How to call api using URLSession in swift 5

Step 1 : Create New swift file link :(" WebServiceManager.swift ") Step 2:  Copy and paste this code in you // //   WebServiceManager.swift // import Foundation import UIKit typealias ServiceResponse = ( _ reponse:[ String : AnyObject ], _ error: Error ?) -> Void class WebServiceManager : NSObject , NVActivityIndicatorViewable {     static let sharedInstance = WebServiceManager ()     var reachability : Reachability ?     var activity : NVActivityIndicatorView !          let baseURL = SERVER_URL          func checkConnection () -> Bool     {         self . reachability = Reachability (hostname: baseURL )                  return ( reachability ?. isReachable )!     }          func makeHTTPGetRequest (path: String , onCompletion: @escaping ServiceResponse )     {         if checkConnection () == false         {             let viewController = APPLICATION_DELEGATE . navigationController